Tips and Tricks

Duck Bill Do's and Don'ts


2012-09-12-08-20-08-B65E0907.jpg

2012-09-12-08-20-08-B65E0907.jpg

The Little Things Make a Difference

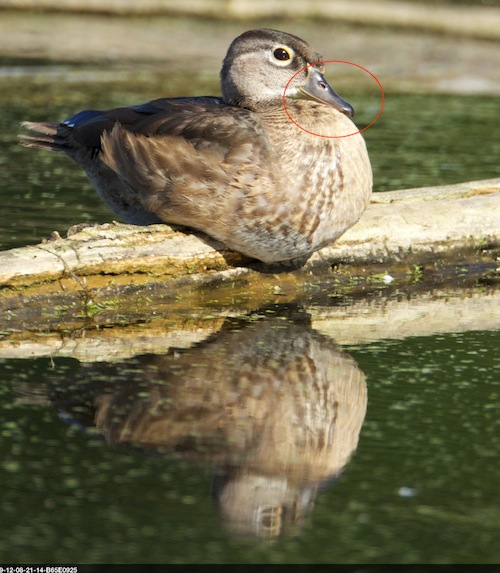
The opening image isn't perfect from a composition standpoint (I don't like the dark line running right across this Wood Duck's head or the contrast change running through his head) but the angle and position is pretty good.  Good eye and head position compliment the upright pose of the bill, turned slightly towards the camera and the gap between the beak and the body looks natural.

Discussed below are a few of the things to avoid.

Aperture-2.jpg

Aperture-2.jpg

This first image is a non-starter, the top of the log cuts right through the head and bill.

Aperture-3.jpg

Aperture-3.jpg

The second image has the bottom line of the bill "merged" with the top line of the body - doesn't appear natural and is a little disruptive.

Aperture-4.jpg

Aperture-4.jpg

The third image is better, there is separation between the bill and the body - but just a sliver.  Again, this is a little distracting to the eye.  The composition (in the opening photo) has more separation and a more upright head angle, producing the best overall image.

As your photography improves, you should begin looking for these types of details in the field - and understanding when to pull the trigger.  It comes with practice and will naturally get better with the more images you take.  You'll notice things like eye contact and head angle - when the background is not working for you and when various elements are pleasingly separated.

Stay in Focus,

Mark

Don't Let the Mid-Day Sun Ruin Your Photo Outing

2012 2012 08 31 31 | 12 30 56 | B83H5981 HDR  Version 2 Yes, for outdoors shooting it's hard to beat the "magic hours" of sunrise and sunset - and the two to three hours after sunrise and before sunset aren't too bad either.  But what do you do with that "11-3" slot?  Here's two scenarios to try.

Get in Close

The harsh mid-day light will have less impact on your shots if you get in close to the subject and eliminate any background elements.  You purposefully minimize the high contrast range in your shot.  The engine shot above was at high noon.  By getting in close I eliminated the bright sky and white concrete - not to mention the reflections off the leading wing edges.

2012 2012 09 08 08 | 10 19 37 | E01C0139 HDR  Version 2

Shoot HDR

You don't like HDR you say?  Really?  Maybe it's the "grungy" HDR that doesn't suit your style?

Remember, that "grungy" and exaggerated look is only one style of HDR.  High Dynamic Range photography can look anywhere from very natural all the way to over the top.  Shooting HDR at high noon (the way the second image above was shot) makes the lighting conditions virtually irrelevant.  Take 3 to 5 shots over a range of exposures, use your favorite HDR or stacking program and make a great natural looking shot.

Many More Ways

There are many other scenarios to use during "bad" lighting times, not just these.  Plenty of interesting things can be found in the shade and a small diffuser can give you a bit of your own shade for smaller objects.  Flowers, insects, old fences, abandoned equipment.  Take the time to look and you'll find your mid-day shots!

Stay in Focus,

Mark

Revisit Your Work

2010 Edit What a difference three years can make!

I mentioned in a previous post to never go back and delete your older work - always save it as a reference of how far your photography skills have come.  I still hold firmly to that statement, even though your previous work may be obviously sub-par to your current capabilities - keep it as a timeline of your progression in the hobby.  There is another reason, however, why you might want to go back and revisit some of your previous work  . . . your editing skills have probably improved significantly.

Go back and take a look at some of your older images - ones that you still feel have pretty solid photographic elements - take an original copy of that photo and reprocess it as you would do it today.  You may be very surprised at how far you've come.

The opening image in this set is from an air show three years ago.  The image capture is pretty solid, with good exposure - and it demonstrates my processing skills circa 2009.  The picture below is the same image, processed with my 2012 skill sets - the difference in skill growth is obvious to me in several areas:

  • Composition: a much better crop demonstrates a better grasp and positioning of the main subject
  • Contrast: more detail (that was in the original image) is now popping out
  • Selective editing: sharpening, shadow work and color corrections are now applied to only the areas that need them

2012 Edit

So don't go back into your past albums and delete any of your images - but do go back and revisit some of them.  You'll be amazed at your progress - and may just find some hidden gems waiting for your contemporary skills to be applied.

Stay in focus,

Mark

Friday Funnies - March 16th

MCT 03 2012 03 16 2012 2092 Just Hanging Around . . . Waiting for a Chance to Split

Sometimes you just never know what the lens of your camera will find - so take it as it comes!

I've seen others create images with this pose - and have actively tried to get my own for the past several years with no success.  While chasing a Wood Duck recently (also with no success) - this little fellow decided to pose right in front of me for a few seconds.

  • First lesson learned:  All the shots you're looking for will come your way . . . but it will be in nature's time, not necessarily yours.
  • Second lesson learned:  That shot may come your way and only stay for a moment - so be prepared.  Understand your equipment, settings and exposure requirements intimately so you can switch on the fly - and take advantage of the beauty nature has chosen to place in front of you.

Stay in focus,

Mark