Image Editing

Better "Lemonade" With Filters


A "lemonade shot" is one that's not quite right (out of focus, too much noise, etc) that you improved upon by accentuating the fault.  This King Fisher is a great example.

The bird was not in sharp focus and was very far away which dictated a very deep crop - really making the noise stick out.  So to make some lemonade out to this, the following formula was used:

  • Heavy noise reduction, even on the bird, which served to further smooth it out
  • A softening filter to smooth it out even more (accentuating the lack of focus on the bird)
  • A "painterly" filter even further accentuating the softness of the image.

The final result is an "artistic" image that does a nice job of presentation.  Trying to fight the reality of this shot (working contrasts and details of the bird - followed by selective sharpening) would have resulted in a mediocre shot at best, most likely ending up in the trash.

Here as some great filter packages to checkout and play with.  Give em a try!

Stay in focus,

Mark

White on White

Excerpt from "The Shooter's Blueprint" Series MCT Vanity Owl

I've received a lot of questions lately due to a guest post I did on Photographer Rick Sammon's Blog regarding capturing a white subject on a white background.  Especially with winter around the corner for some of us, I hope the tips below help.

Shooter's Blueprint

White Subject on White Background

The settings will vary depending on what the exact scenario is, so let's use the parameters below.

NewImage

The trick to this shot is to expose as far to the right as you possibly can, without blowing any highlights out.  With a white subject, you want your data to be almost entirely in the right third of the histogram.  Anything less than that and your whites will start to look muddy, and correcting them will result in less than stellar results.

Blueprinter’s disclaimer – there is always more than one way to accomplish something, this just happens to be the way that works for me.  All adjustment references are related to Apple Aperture software - other packages have similar adjustments.

Camera Setup:

  • Exposure Program: Shutter Priority
    • Aperture is not an issue with this shot - there is only one subject and it is fairly far away.  (Depth of Field on this shot was around 1.5 feet)
  • Shutter Speed: For a moving subject, 1/1,000th is minimum - I chose 1/2,500th for these owl shots
  • ISO: 400
  • Exposure Compensation: 1.67ev
    • It's takes time to get a feel for this, just remember what you're trying to accomplish (exposing for the whites, as far to the right as you safely can and no blown highlights) takes practice.  It was a bright day and a lot of white in front of me - I started at 2.0ev and came down slightly after consulting my histogram. (oh yea, take test shots before the feathers start flying!)
  • Focus: AI Servo (Canon speak for continuous)
    • I used a cluster of focus points in the right of my frame as this owl was making his runs into the wind (right to left).  Using the right points allows me to leave room in front of the owl.
    • When focusing on a white subject, find some contrast to lock onto (that's how most focus systems work)  The Owl's upper chest with the dark bands was perfect and roughly on the same plane as his head and eyes.

Original RAW Shot

MCT Raw owl

Original Histogram

Raw histo

Post Processing:

  • White balance: Tweaked slghtly
  • Black point: Adjustment cranked up about halfway
    • Just shy of blocking the dark claws
  • Definition Slider:Moderate adjustments (up to half way)
    • Be careful not to blow any highlights out in the process
  • Shadows Adjustment: Moderate to high adjustments here returning depth and detail
  • Levels Adjustment:Basic adjustments as needed for accurate balance.
    • Be careful of a blueish color cast bleeding over into the subject
  • Sharpening: To personal taste and output goals

The adjustments above yielded the results below.

Final Image

MCT Final owl

Final Histogram

Final Histo 1

Your digital sensor captures more detail in the right third of the histogram, so the goal here is to get as much of this "white" data in that area - without blowing any highlights - I know, it's a thin line to walk, but you can get ever closer to it with practice.  Post processing (Black Point, Definition and Shadows adjustments) then allows use of this maximum data to adjust as needed and end up with a great shot!

One Final Tip . . .

This technique is accomplished shooting raw - so don't go by the image on your camera's back screen as reference in the field (it will look washed out).  Rather make sure you didn't blow any highlights (no "blinkies" in your histogram) and create your final image in post.

Have fun and stay in focus!

Mark

Make Lemonade!

Film Filter Goose It happens to all of us, amateur and pro a like, you think you have a great shot in the field, only to get home and find out it's just not quite right.  Maybe you blew the highlights a bit, or missed the focus, or . . .  take your pick, there's a whole bunch of possibilities!   So what do you do now, trash it?

I don't think that should automatically be the next choice - at least not yet!  If the image has some character, let's get creative and try to save it!  Take a look at your image editor of choice (or plug-ins that work with it) and see what filters are available - just start playing around with the options - try black and white and go from there -  see what happens!  (remember, you were probably ready to trash the shot - so it's not like you going to ruin it or anything!)

Glamor Goose

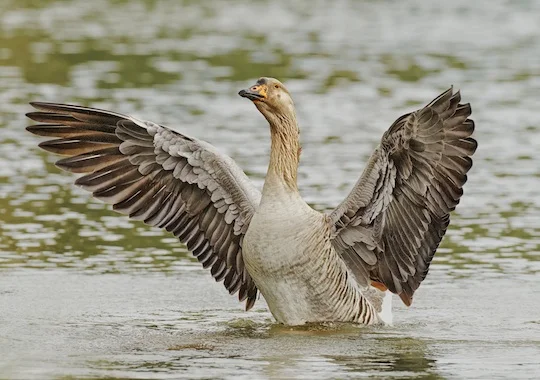
The shot above was almost completely "bad lemons" (blown highlights and out of sharp focus) but it had some character to it  These fellows were having a gentleman's disagreement over a lady and the goose on the left seemed to be yelling directly in the the other chaps ear.

From the Imperfect Photographer's Dictionary . . .

Bad lemons: all the sugar in the cupboard won't make these images sweet!  A really bad lemon usually has three or more critical flaws (the geese above have two) or a particular flaw is exceptionally bad.  For example, if the focus was so terrible that you couldn't identify the critters as water fowl, that would probably qualify!

This image was too cute, I had to do something to save it.  My personal choice in filters is Nik Color Efex Pro and the primary effect in the goose image is an effect called "Glamour Glow".  Now it's still not a great image - but I like the personality it has!  If an image is technically perfect, but boring, there's not much you can do - but an interesting image will give you some latitude and allow some imperfections to be overlooked.

Give it a try the next time you end up with lemons, make some lemonade.   Checkout my "lemonade" gallery, I decided to get my own collection together!

I've included some links  to a few good creative filter packages, check out the trials and see what you think!