Dynamic Images


Good photography communicates and conveys the essence of its subject.  If you're subject is alive and dynamic - your photography needs to telegraph it at the first glance. Fast things need to look "fast".

  • The core of the moving subject should be in sharp focus.  Everything else around it will communicate the motion
  • Practice your panning technique - this post will help to get you started 
  • Over time, gradually begin to slow your shutter speed as your panning technique improves

Stay in focus, 

Mark

Plan Your Shots


How often do you see something with potential, but you don't have time or the light is bad?  Well, take just a couple minutes and plan for the future. 

  • Use your cell phone and take a quick picture.  Use the geotagging feature so you can find the location again.
  • Pay attention to the direction and what the lighting may offer at a different time of day.  Morning shot or evening shot? 
  • What's going to look better, a nice blue sky, puffy clouds - or maybe even rain! 
  • With your plans in place - wait for the perfect day. 

Stay in focus, 

Mark

Overexposed?? - No Problem (Part 3)

We left off with last time in this series having completed exposure and recovery adjustments.  The next step is to selectively adjust only the highlights.  The easiest (90% of the time) way to do this is the Highlights and Shadows Adjustment sliders (as Aperture calls them).

In this case, we obviously want to reduce the highlights, so that's the one we'll work with.  Pull the slider to the right and watch the preview.  It's takes a little bit of a feel to know how much is too much, but the general rule of thumb is to watch the mid-tones.

Move the slider while watching your preview, as soon as you see the mid-tones of the image being impacted by the Highlights slider - stop.  Now back off the adjustment just a bit.

Highlight Adjustment.jpg

The results can be significant, as the histogram below demonstrates.  Notice the better balanced readings, with nothing on the right edge.

Ending Histogram.jpg

Compare that to the original histogram before we started with any adjustments.  Major improvement here overall - including a successful recovery of the blown out areas (Only RAW would allow you to accomplish this!

Beginning Histogram.jpg

And here is the final exposure result.  The only other adjustment made here was a slight tweak to the Black Point slider.  A usable and pleasing image has emerged from a shot that was destined for the trash can!

5 - Black Point Adjustment.jpg

Stay tuned . . . more tips to come in the week and months ahead, including one technique where we will actually straddle that right exposure limit - on purpose!

Stay in Focus,

Mark

Overexposed?? - No Problem! (Part 2)

The first step in this quick process starts with the Recovery Slider (Note, this is what Aperture calls it - other programs have similar functions with different names).  The key feature of this slider is that it's a "selective adjustment".

~A selective adjustment only impacts certain areas of the image, based on different criteria.  The Recovery slider selectively reduces exposure and allows recovery of only the most "blown out" areas of the image~

The impact of this slider is significant as it pulls back the most overexposed elements of the image, beginning the process of recovering detail.  We then adjust our second slider, exposure.  Notice that we tweak this just about a third of a stop negative, to assist in our recovery.  Go easy on this slider, and only use it after you've gotten everything you can out of the Recovery Slider.  Exposure is a global adjustment, and will impact all areas of the image.

Slider Adjustments
Slider Adjustments

At this point in the image, you can start to see the blown out areas begin to tone down - but it looks like we still have a long way to go (as you can see in the image blow, sampled after these two adjustments were made).

Highlight and Exposure Adjusted

Now, don't get discouraged yet!  Even though the image still shows a long way to go, look at how much improvement we've really made - as indicated by the histogram.

Histogram after recovery and expsoure adjustments.

So demonstrated progress has been made - and sets the foundation for everything else to come.  With the highlights themselves now properly recovered, we're ready to move on to the most visible corrective adjustment.  In Part 3 of this series we will focus on selectively recovering detail in the highlights - this is where the image really starts to "pop".

Stay in Focus,

Mark

Avoid the Burn, Rain and Itches - for Fun Summertime Photography


Young buckaroo learning the ropes.

Young buckaroo learning the ropes.

If you’re looking to enjoy the great outdoors (or even your own backyard) for some great summer photography, it pays to be prepared.  Even if you’re not laying in the weeds to get that next great shot, just being outdoors can bring you into contact with mosquitos, chiggers and ticks – not to mention that summertime sun.  When it’s really hot outside, it can be tempting to strip down to shorts, flip-flops and a tee shirt.  Depending on our much “outdoors” you are planning to handle, that might not be the best solution.  Now, I’m probably on the extreme side – being outside during the “buggiest” times for several hours, but here are the 3 tricks that work for me.

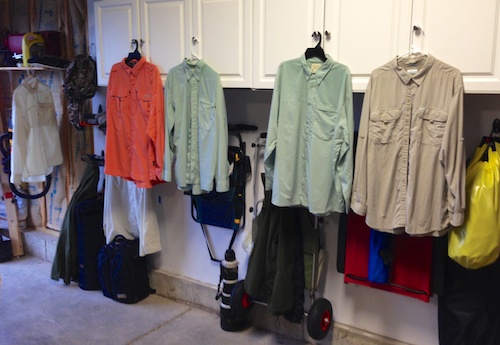
Pick the Right Clothes

Look for light duty material in both pants and long sleeve shirts that are thin, quick drying and provide rated UV protection.  This shirt from Cabelas is one of my stand-bys.  Not only is it extremely light and comfortable, but it provides UPF-50 sunblock protection.  Look for similar qualities in your pants and a good lightweight hat that helps keep the sun off your neck.

Don’t skimp on your foot protection either.  This doesn’t mean you have to wear hiking boots all the time (although that’s not bad depending on where you’re going) but a good pair of hiking shoes that are water resistant are a great idea.

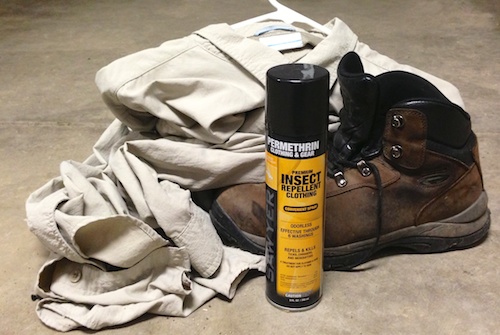
Treat Your Gear to Some Protection

Waterproof your gear

While a raincoat is optimum for a full downpour, the quick showers and light rain you are likely to run in to during most summer outings can effectively be deterred by a little preparation.

NIKWAX, great for packs, shoes and hats

NIKWAX, great for packs, shoes and hats

I use a NIKWAX waterproofing spray on my pack-backs, vest, shoes, boots and hats.  It does a great job of adding that extra touch of water resistance.  NIK has other products for clothes, check them out as well!

"Bugproof" your gear

There are special shirts you can buy that are infused with insect repelling material, but they are expensive and don’t really last through many washings – so why not make your own clothes insect repellent.

Make your clothes insect repellent

Make your clothes insect repellent

Checkout a product called Permethrin.  While DEET is the ultimate in bug protection, I’m happy to limit its use on my skin as much as I can.  Treating my clothing, boots, hat, vest and backpack with a Permethrin spray, I’m able to go almost entirely “DEET Free” for most outings.

Treated clothing should last 5 to 6 weeks.

Treated clothing should last 5 to 6 weeks.

I’ll usually treat all of my gear every 6 weeks or so – it has no smell when dry and easily lasts through 5 or 6 washings.

Accessorize for success

In addition to any personal medications you carry for allergies or other treatments, don’t forget portable versions of insect repellent, sun protection and itch relief.  These small tubes and vials take up hardly any space and come in handy when you need them!

One more accessory to consider – OFF Clip-on Mosquito Repellent.   I’m been extremely impressed with this for keeping ticks and mosquitos away.  It does not work very well while you’re moving but once you’ve stopped (and stay in one place) for about a minute, it does a great job providing you with a bubble of protection.  In fact it works so well, that along with my Permethrin treated clothing, I use no bug spray at all any longer.

Have fun, stay protected and enjoy your summer photography!

Stay in focus,

Mark