demonstration

Overexposed?? - No Problem (Part 3)

We left off with last time in this series having completed exposure and recovery adjustments.  The next step is to selectively adjust only the highlights.  The easiest (90% of the time) way to do this is the Highlights and Shadows Adjustment sliders (as Aperture calls them).

In this case, we obviously want to reduce the highlights, so that's the one we'll work with.  Pull the slider to the right and watch the preview.  It's takes a little bit of a feel to know how much is too much, but the general rule of thumb is to watch the mid-tones.

Move the slider while watching your preview, as soon as you see the mid-tones of the image being impacted by the Highlights slider - stop.  Now back off the adjustment just a bit.

Highlight Adjustment.jpg

The results can be significant, as the histogram below demonstrates.  Notice the better balanced readings, with nothing on the right edge.

Ending Histogram.jpg

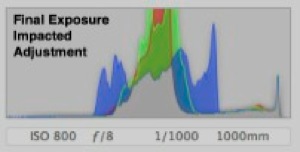
Compare that to the original histogram before we started with any adjustments.  Major improvement here overall - including a successful recovery of the blown out areas (Only RAW would allow you to accomplish this!

Beginning Histogram.jpg

And here is the final exposure result.  The only other adjustment made here was a slight tweak to the Black Point slider.  A usable and pleasing image has emerged from a shot that was destined for the trash can!

5 - Black Point Adjustment.jpg

Stay tuned . . . more tips to come in the week and months ahead, including one technique where we will actually straddle that right exposure limit - on purpose!

Stay in Focus,

Mark

Cold Weather Photography - Lessons Learned

[caption id="attachment_20" align="alignnone" width="200" caption="iPhone shot of my morning setup."][/caption] If you properly prepare yourself, it's amazing how comfortable you can be in cold weather.  (Please note, this is coming from a transplanted New Orleans boy who now lives in northern Illinois - so yes, staying warm and comfortable is definitely possible if I can do it!!)

On a typical late fall morning this year, it was common to have day break temperatures in the low to middle twenties, warming up to around thirty-five by afternoon - perfect weather for photographing the migrating Sandhill Cranes making their way down south.  I'll be posting some specific product reviews and detailed tips on what worked (as well as what didn't) but in a nutshell, here's a list of some of the basics:

  • Warm and dry feet are Number One: Ensure your boots are waterproof, even if you don't plan on being in water.  Wear hocking or hunting socks that are appropriate for the temperature.  (and keep a dry pair in your backpack just in case)
  • Two pair of gloves work best: Keeping my fingers warm seems to be the hardest for me, and the needs of camera controls make this even more challenging.  I wear a pair of this UnderArmor glove liners as my first line of defense, they're thin and allow for great tactile control.  If needed, my second pair of gloves go on.  These are AquaTech Sensory Gloves that allow your thumb and index fingers to poke out when needed - really does the trick!
  • Keep your butt high and dry: You're not going to stand all day, and the ground will be (at best) cold and (at worst) wet which is a recipe for an uncomfortable photo hike.  Bring along your own seating.  I prefer a packable walking stool as they are very comfortable for long stays but any local sportsman's store will also have a large selection of hunter's cushions designed to provide a little padding and some insulation.
  • Pay attention to where you drop your gear:  Depending on where you are, the ground may look dry but moisture can be lurking just below the surface.  If you can't hang your pack, try laying it down on a bowed over bed of reeds, a bush or a stump.  Don't just toss it next to you on the ground and expect it to be dry when you throw it on your back two hours later!

Well, those are some of the basics on my first real month of outdoor cold weather photography. Over the next several weeks I'll be expanding on what I've learned with some deeper dives into gear, techniques and even some below zero weather tips - so stay warm for now!