Book Review - Ducks of North America - The Photographers Guide

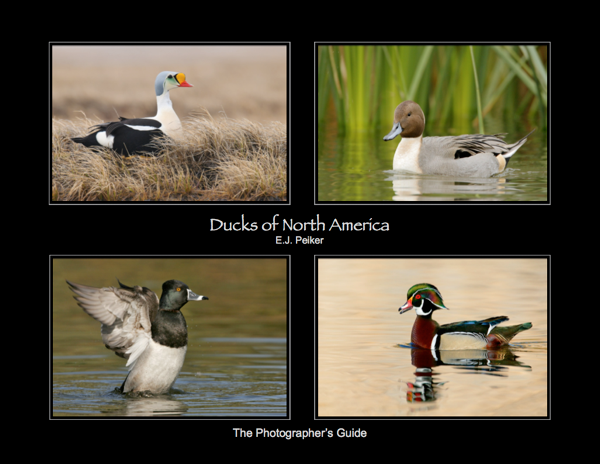
Ducks Photo books are a dime a dozen, and most rehash all the same stuff over and over again - but E.J. Peiker's book is different, it's targeted specifically at one subject - ducks.  The book does cover all the standard fare topics (equipment, exposure, light, technique . . . and so on) but every subject is directed back to the book's main focus - how it relates to ducks!  The section on field techniques is very detailed and was found to be a strong benefit to enhancing my outdoor acumen - espeically the section on Outdoor Flash Photography.

Field Techniques Section:

  • Approaching Wild Ducks
  • Exposure
  • Composition
  • Natural Light Photography
  • Outdoor Flash Photography
  • Lens Technique
  • Ducks in Flight

It's an easy, enjoyable and informative read!  This is also one book that you'll keep handy as it makes a great "field guide" of ducks, both native and visitors to north america, as it is wonderfully illustrated with E.J's great images.  I use it regularly as a reference to confirm identification.

Now this is an eBook, but I consider that an advantage as it's always with me (in my iPad or iPhone) and available for that quick identification.

You haven't tried an eBook yet?  Well, this is a great one to start with then!

Purchase it Here

I have no affiliation to the vendor in the link provided other than being a satisfied customer.

What You Think's a Great Image May Not Be - And Vise Versa!

Great Blue Heron

We all have certain images that we love, in our eyes they're the best of our best.  (so far at least!) We love them, and we expect others to love them just as much as we do - but it doesn't always work that way.  The opposite can equally be true, images that are "so-so" for us can be a fan favorite.  So why does this happen?

When you look at an image you've made - you actually experienced the capture, the environment, the look, feel and smell of the place.  It invokes a very specific perspective for you (good or bad) that is colored by the experience you've had.  When someone sees an image for the first time, they lack that same perspective.

The image itself (and maybe a short caption) is all they have to go on.  They decide how much they like or dislike the picture based solely on what the image "tells them".  What story does it communicate and does it trigger any emotions in the viewer?  Does it have "personality" or "interestingness"?  Is there a unique element to it that makes it "stick"?  When someone views your image, your personal opinion doesn't matter - case in point is the image at the beginning of this post.

I made this image on an overcast afternoon with rather harsh light.  I wasn't planning on stopping at the river so I didn't have my longest lens, hence the Heron was pretty far away.  When I got home and processed the image, I had to crop in way too far - and due to the harsh light I had to really work over the exposure and level adjustments, there was some noise - and it wasn't as sharp as what I would have liked . . .  and so on.  My experience with this image wasn't the best - when I looked at it, I saw all the "flaws" - that was my vision and my perspective, I didn't really like it because I saw all of the things that should have been done better.  Now just as is the case with an image I really like (due to my experience with it) the viewer of this image is not colored by my perceptions, all they see is color, action and whatever the image communicates to them.

I posted this image on a few sites I frequent just to document my efforts for the day, not thinking much of it.  The next morning, there was some great feedback on the shot - people loved it!  Go figure, so I decided to enter the image into an online weekly contest and it scored a second place (within a hair's width of first) with awesome feedback!  What people saw in that image (without the baggage I was carrying) was a great story, interestingness and emotion!

Keep that in mind the next time someone yawns at an image you've made, without your perspective and experiences as the photographer - does the image carry the load all on it's own, from  a standalone perspective?  I think that's the indicator of a really great image, can it invoke the emotion, color and story - all by itself!


So I'm a "Chimp"!

[caption id="attachment_91" align="aligncenter" width="480" caption="Young Bald Eagle soaring above the Mississippi"][/caption]

See definition below . . .

chimp v. to take a digital photo and look at it on the camera’s screen.

Yes, I guess that does make me a "chimp" then. I realized this yesterday when I was standing with a group of "real" photographers shooting eagle pictures. I'd take a series of shots and review them on my screen - and out of the corner of my eye I could see a smirk and an occasional disapproving look. This has been labeled as an amateur behavior and not the proper way to make pictures. I guess it comes from the days of film, where you couldn't see your images until they were developed. It seems to be a badge of pride to not "chimp". Well, I guess I have a different opinion.
I'm out here to learn and improve my photography most of the time, and yesterday was no different. The technology of digital allows me many advantages, so I use them to the fullest. I'm able to take a series of shots and immediately look at the results on a high resolution screen and checkout the histograms. I'm able to try different exposure modes or methods of tracking focus - review, learn and correct - in real time. It's made me a better photographer.
I'm trying to learn, why wouldn't I take advantage of that!? I suggest you do also if you're trying to learn - be a proud chimp! The image above is the result of a series of experiments on different exposure techniques - I'm satisified!

AutoMagic ISO

[caption id="attachment_86" align="aligncenter" width="480" caption="Eagle vs Eagle"][/caption]

As of this weekend, I'm back to shooting eagles on the Mississippi River. These guys are hard enough to capture and track as they fly above and then dive below the skyline - without having to worry about the correct ISO settings. But the drastic change from light sky to darker waters requires it - or else my shutter speeds would drag to a halt. Maintaining exposure compensation with gloves on is hard enough - adjusting ISO on the fly to be sure I don't run out of shutter speed is just more mental load then I can handle. Enter Auto ISO mode.

Now, not all cameras have this available - but if your's does (check your manual) it's worth playing around with. Here's the routine I run with:
  • In setup, I cap my ISO max setting at 3200
  • Set ISO to "Auto"
  • Shoot in Shutter Priority (Typically 1/1000th of a second for birds in flight)
  • Set initial Exposure Compensation to work for a sky shot

With this setup, my aperture almost always drives as low as it will go (f/5.6 in this case) and my shutter stays constant. So basically I'm locked in at f/5.6 and 1/1000th all the time. As more light (or sensitivity) is needed, my ISO automatically starts to increase.

As usual, this may not be the right or best way - but it's working for me! It allows me to focus on the two things that are most important, framing the shot and adjusting exposure compensation for correct metering. Give it a try and see what you think.

Luck Favor's the Prepared!

[caption id="attachment_77" align="alignnone" width="432" caption="Truck vs Plane"][/caption] I made the picture above at a recent air-show and posted it on my Flickr stream. I got a very nice complement from a gentleman that was also at the show - "Great example of what can happen when preparation meets opportunity. Fun shot !" As I read this, I thought to myself "preparation nothing - this was all luck!". But then I started to think about it, he was right - a year ago, this would have been all luck but that wasn't the case any longer.

I knew going into the show what the conditions were (where the sun and shadows would be) and I mentally made note of what exposure compensation might be needed as I transitioned from a sky shot to a ground shot. Heck, I was a little prepared! I also used the camera settings below which worked out pretty well:

  • Shutter Priority (around 1/750th for prop aircraft and 1/1500th or above for everything else)
  • I didn't want my depth of field to narrow so I set my minimum aperture at f/11 to ensure I maintained better DOF.
  • I sent my ISO on auto with the ability to max out at 3200
  • Finally, I did adjust my exposure compensation during shooting to match the conditions, anywhere from +.25 to +1.5

So yes, I was prepared this time around . . . . . and very lucky I was panning with the plane for this shot!

You can check out some of the other shots here.