Wildlife and Nature

Always Look Behind You

MCT 2011 12 02 5652 I had the opportunity to visit Fossil Rim Wildlife Park south of Dallas Fort Worth recently (a separate review coming soon) and was shooting out of my driver's window.  I was so focused on what was in front of me, that I neglected to notice the interloper behind me - until he already had my lunch in his mouth!

Now, from a serious point of view - do make sure you "look behind you" when on nature and landscape shoots.  Some of the best shots I've gotten were 180 degrees opposite of my primary subject that day.  For example, the light in a sunrise shoot can be just as dramatic on the landscape behind you as the sunrise itself.

MCT 10 2011 10 22 2011 1024 HDR

Use your eyes as well as your lens when out in the field.  Constantly scan the field around you and keep your eyes sharp for interesting shadows and lighting - not to mention the occasional critter!

Stay in Focus,

Mark

The Real World - Cold Weather Shooting Tips

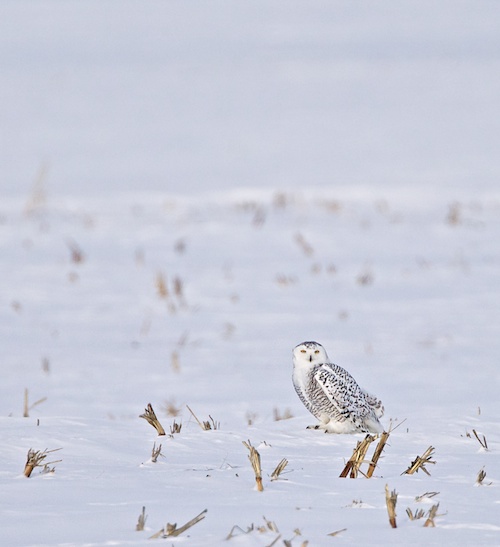
Snow Owl 2011 02 13 7980

3 years of cold weather shooting (down to -23F) has taught me a thing or two.  Here are a few rock solid tips - some you've probably read a few times, along with a few that will be unique!

Camera and Gear

  • Moving from cold to warm - and vise versa
    • Probably the most common topic addressed, my answer is very simple - pack your gear in a photo bag, and leave it there for a little while. For example, the pack will be warm when leaving your house and will allow the camera gear to gradually cool down in the car or field.  The same concept works when going back into the house - I take my memory cards out of my camera/bag (and anything else I want to get to immediately) and then let the bag sit for a few hours in the warm house.  The camera gear will gradually adjust to room temperature.
  • Keeping your breath in check on a really cold day (this is the really big one)
    • Use a lens hood  - the shorter the lens the more critical this tip is.  Your breath (even straight from your nose on a really really cold day) will roll around and frost up the front of your lens - and there is no easy way to get it off without warming up the lens.  This is a real killer just as the sun starts to crest above the horizon on a fantastic cold weather sunrise shoot (yea, ask me how I know about this!)
    • Use some "Scope Dope" to help keep your LCD clear.  This stuff does a pretty decent job on the LCD and an ok job on the view finder.
    • Use a Hoodman Eye Cup to keep your breath away from your view finder.  Actually turn it vertical like in the image below for the best results, it does a great job of keeping your view finder fog/frost free in all cool to cold weather.

MCT 01 2012 01 02 2012 2034

The Photographer

Feet

  • Keep your feet warm, dry - and on the ground where they belong
    • Don't slip!  There are now plenty versions of the YaK Trax seen in the image below.  Get a pair, they work wonders on ice (including ice that is hidden below a layer of snow)  There are even versions now that have actual spikes.

  • Dry feet are happy feet!
    • If you're in wet or snowy conditions, it goes without saying to at least have water-proof boots/shoes.  In light snowy conditions (1" - 3") consider a simple pair of elastic leg gaiters (as seen above) to keep the snow out of the top your boots.
    • In heavier snow (greater than 3 inches and up to 7 inches) try some of the Neos brand products.  The image below shows me using the Neos Trekkers in water but they do the job in snow as well.  Warmer versions are also available - to cover both the "dry" and "warm" requirements.  And yes, you CAN COMBINE the Neos product with Yak Trax.

Iphone blue herons 4 4 10 2010 04 04 55 original

Hands

  • My hands are the hardest body part to keep really warm.  Before I talk about gear, here is the most important tip I've learned over the years - once your hands (fingers) get cold, you're in trouble.  Get out of the cold and get them plenty warmed up again.  So the best tip is to have your hands fully warmed up before you set foot outside - "gear up" in advance so you move into the cold with maximum advantage.
    • 1st layer of protection - liners with pockets for warmer packs.  The pockets locate the warmer packs on the back of your hand, above your blood vessels, enhancing the warming impact for your fingers.
    • 2nd layer of protection - primary winter gloves, water proof with thinsulate or other warming material.  How heavy this primary pair of gloves are is up to your personal needs.
    • 3rd layer of protection - Mega Size Hand Warmers. Depending on how cold it is, I'll keep 2 or 4 of these in my coat pockets.  Hands go in the pockets when not in use and I'll actually hold these mega warmers in my hands (between my hand and the camera) when I'm doing extending shooting in really cold weather.

Body

  • Keeping your core body temperature up helps you stay warm longer.  So similar to your hands, get toasty (without sweating) before you head outside.  Staying dry is a very critical component of staying warm, and layers are the other key.
    • 1st layer of protection:  Light duty long underwear made of water wicking material (not cotton) to help you stay dry
    • 2nd layer of protection: Medium duty long underwear is added as a layer to increase warmth
    • 3rd layer of protection: Heavy duty long underwear is added (depending on how cold it is)
    • 4th layer of protection:  Outer shell winter coat this is roomy (with your layers on) wind and water proof.  Collar protection and an insulated hood are a must as well

Head

  • Your head is one of the primary places heat escapes your body, so keep protection on and layer it as much as needed.  I'll typically wear a full face mask and my winter coat's insulated hood.  When it's needed, I'll add a neck gaiter or a warm cap.

IDMkIV L D14 2011 01 15 2522 Original


Staying warm is not only the safe and smart way to shoot in the winter, it's also the path to great images.  When you're warm and comfortable, you can place all your energy on the task at hand - getting some great shots!!

Stay in focus,

Mark

Review: Bosque Workshops

MCT 2011 12 09 7732 I had the opportunity this year to make it to Boque Del Apache Wildlife Preserve for the first time - WOW!  Fantastic landscape and the birds (geese, ducks and cranes) certainly did not disappoint.

Since this was my first time there, I decided to participate in a photography workshop with seasoned veterans (Rick Sammon and Juan Pons) who knew their way around the preserve as well as a camera - and they most certainly did not disappoint!

MCT 2011 12 08 7697

Our workshop began on the evening of December 5th and the weather was a real challenge - 8" of snow at the beginning on the week and below zero temperatures for the rest of it.  Juan and Rick were determined not to let the weather deter us and found new and interesting places to shoot for the first day and a half (when Bosque was actually closed due to the weather)  The alternate sites were fun and full of adventure but most importantly, the guys kept it very upbeat and interesting.  Once we were able to enter Bosque, we were treated to a true winter wonderland, with Juan scouting out super locations for both morning and evening while Rick provided excellent insight into composition and new techniques.  Always eager to lend a hand, these workshop leaders were a delight to the entire class.

Now, their dedication and first class instruction was really great - but what makes these two fellows truly unique is the care and concern they show to all of their participants, regardless of skill level.  In this day of "photo egos" and the many "professionals" flying at a higher than thou level - both Rick and Juan were firmly planted on the ground, providing excellent instruction, encouragement and support - even though their skills certainly flew high.

MCT 2011 12 03 6147

I can enthusiastically recommend both of them for their learning style, passion and sincere desire to help aspiring photographers.  Checkout some of their work, learning materials and upcoming workshops - you won't be disappointed!

Stay in Focus!

Mark

White on White

Excerpt from "The Shooter's Blueprint" Series MCT Vanity Owl

I've received a lot of questions lately due to a guest post I did on Photographer Rick Sammon's Blog regarding capturing a white subject on a white background.  Especially with winter around the corner for some of us, I hope the tips below help.

Shooter's Blueprint

White Subject on White Background

The settings will vary depending on what the exact scenario is, so let's use the parameters below.

NewImage

The trick to this shot is to expose as far to the right as you possibly can, without blowing any highlights out.  With a white subject, you want your data to be almost entirely in the right third of the histogram.  Anything less than that and your whites will start to look muddy, and correcting them will result in less than stellar results.

Blueprinter’s disclaimer – there is always more than one way to accomplish something, this just happens to be the way that works for me.  All adjustment references are related to Apple Aperture software - other packages have similar adjustments.

Camera Setup:

  • Exposure Program: Shutter Priority
    • Aperture is not an issue with this shot - there is only one subject and it is fairly far away.  (Depth of Field on this shot was around 1.5 feet)
  • Shutter Speed: For a moving subject, 1/1,000th is minimum - I chose 1/2,500th for these owl shots
  • ISO: 400
  • Exposure Compensation: 1.67ev
    • It's takes time to get a feel for this, just remember what you're trying to accomplish (exposing for the whites, as far to the right as you safely can and no blown highlights) takes practice.  It was a bright day and a lot of white in front of me - I started at 2.0ev and came down slightly after consulting my histogram. (oh yea, take test shots before the feathers start flying!)
  • Focus: AI Servo (Canon speak for continuous)
    • I used a cluster of focus points in the right of my frame as this owl was making his runs into the wind (right to left).  Using the right points allows me to leave room in front of the owl.
    • When focusing on a white subject, find some contrast to lock onto (that's how most focus systems work)  The Owl's upper chest with the dark bands was perfect and roughly on the same plane as his head and eyes.

Original RAW Shot

MCT Raw owl

Original Histogram

Raw histo

Post Processing:

  • White balance: Tweaked slghtly
  • Black point: Adjustment cranked up about halfway
    • Just shy of blocking the dark claws
  • Definition Slider:Moderate adjustments (up to half way)
    • Be careful not to blow any highlights out in the process
  • Shadows Adjustment: Moderate to high adjustments here returning depth and detail
  • Levels Adjustment:Basic adjustments as needed for accurate balance.
    • Be careful of a blueish color cast bleeding over into the subject
  • Sharpening: To personal taste and output goals

The adjustments above yielded the results below.

Final Image

MCT Final owl

Final Histogram

Final Histo 1

Your digital sensor captures more detail in the right third of the histogram, so the goal here is to get as much of this "white" data in that area - without blowing any highlights - I know, it's a thin line to walk, but you can get ever closer to it with practice.  Post processing (Black Point, Definition and Shadows adjustments) then allows use of this maximum data to adjust as needed and end up with a great shot!

One Final Tip . . .

This technique is accomplished shooting raw - so don't go by the image on your camera's back screen as reference in the field (it will look washed out).  Rather make sure you didn't blow any highlights (no "blinkies" in your histogram) and create your final image in post.

Have fun and stay in focus!

Mark

Learn Your Subject

MCT 09 2011 09 16 2011 1 of 1

The single best way to learn about your subject is to observe them for yourself.  Books and articles are a great start and help a bunch, but nothing takes the place of experiential learning - it tends to "stick" better this way, at least for me. Now, you may ask, "I'm a photographer, here to take a picture, why do I need to learn about . . . drag racing, birds, airplanes, etc?"  Well, first off, it can be a lot of fun - but from the photographer's perspective it can keep you from missing "the shot".  Let's take a look at an example.

MCT 09 2011 09 19 2011 2 of 4

Consider the Egret above.  As I've mentioned before, action photography can be boring - and the morning watching this egret was no different.  Now, having observed these animals before, I knew the following points (which helped me find a egret in the first place)

  • It is common for these animals to hang out for long periods of time at sources of moving water, where it is shallow enough for them to walk.  Gently moving water at the edge of a river or stream is another favorite place (as it was for the egret in the vanity image at the beginning of this article)
  • When they lock in on a breakfast target, they move very fast.  If your camera isn't already at your eye, it's easy to miss most of the action.

This fellow stood in the same spot for a good 40 minutes, moving his head around, but not much else.  Now, since I was hand holding, keeping the camera at my eye was a non-starter.  Heck, even with a tripod I probably wouldn't be scoping him out every minute.  Ok, so we're faced with a conundrum . . . we know these guys move fast when the time comes, but it can take 40 minutes or longer before something happens - how do we know when to get the shot?


MCT 09 2011 09 19 2011 1 of 4

He's where the benefits of observation come in.  Notice in the image above that the egret has leaned his head slightly forward and is looking down - something has caught his attention.  It's a subtle move, but I knew from observation that it indicated a "target" was located. (Hint, bring your camera to your eye now).  At this point, one of three things is likely to happen:

  • It could be a false alarm or the fish moved away
    • The egret's head will move back to a more straightened posture
  • The target is close, and within reach of a strike
    • Thrusting his head in the water, a fish becomes breakfast
  • It's a good target, but requires repositioning.  With the head still focused down, a step or two is taken before a strike.
    • Example in the image below.

MCT 09 2011 09 19 2011 3 of 4


If you've been paying attention (and not watching the ducks take a bath), you'll have enough time to deliberately bring the camera to your eye, focus and check your settings.  You're ready if a strike happens.

MCT 09 2011 09 19 2011 4 of 4

From strike, until the fish slides down the throat, can take only seconds.  So if you're not ready, chances are you'll miss the shot all together - or get a shot off - but it's out of focus as you had to move too fast.

So take some time and get to know your animal subjects (same thing goes for any other subject, really).  It's a great thing to do later in the day when you've lost the light anyway.  And here's another tip, what you learn about one subject can usually benefit you with others.  As the shot below indicates, Great Blue Herons hunt in a very similar fashion, long periods of standing around looking, and about 10 seconds of pure action.

MCT 09 2011 09 19 2011 1 of 1

I've noticed that Blue Herons will strike more quickly (you don't usually have a bent neck as a tip off) and more aggressively - often spearing the target with their beaks.  What an amazing thing to watch!

Mark