General Photography

Exit Your Comfort Zone


For the love of a dog

If it flies, I shoot it!

Portraits are not something I'm comfortable with, not that I don't enjoy it - I just haven't really done a lot of it.

  • I've got to give direction?  But birds don't take direction?
  • Reflectors and light modification?  I only use fill flash?? 
  • Post processing?  There are no feathers, what the heck do I do!? 


Get out and do it

For me, the best way was to get with a few guys and gals who know what they're doing.  We spent a couple days in South Dakota with a few "hired hands" as models.  It was a relaxed, low pressure environment, working on posing, atmosphere, composition and edits.  Now, I'm certainly no portrait wiz - but I have a feel for it now and the basic techniques to apply.  This gives me enough confidence to continue learning on my own.

There are other ways

I chose a mentored approach for this learning experience but books, videos, online training as well as trial and error can work just as well - what's comfortable for you?  With a little of all of the above, I taught myself macro photography in a low stress environment over time, it worked well!

So get out there and try something new, you'll be surprised at how quickly you'll learn to extend your techniques. 

Stay in focus, 

Mark


Dynamic Images


Good photography communicates and conveys the essence of its subject.  If you're subject is alive and dynamic - your photography needs to telegraph it at the first glance. Fast things need to look "fast".

  • The core of the moving subject should be in sharp focus.  Everything else around it will communicate the motion
  • Practice your panning technique - this post will help to get you started 
  • Over time, gradually begin to slow your shutter speed as your panning technique improves

Stay in focus, 

Mark

Overexposed?? - No Problem (Part 3)

We left off with last time in this series having completed exposure and recovery adjustments.  The next step is to selectively adjust only the highlights.  The easiest (90% of the time) way to do this is the Highlights and Shadows Adjustment sliders (as Aperture calls them).

In this case, we obviously want to reduce the highlights, so that's the one we'll work with.  Pull the slider to the right and watch the preview.  It's takes a little bit of a feel to know how much is too much, but the general rule of thumb is to watch the mid-tones.

Move the slider while watching your preview, as soon as you see the mid-tones of the image being impacted by the Highlights slider - stop.  Now back off the adjustment just a bit.

Highlight Adjustment.jpg

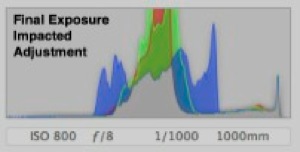
The results can be significant, as the histogram below demonstrates.  Notice the better balanced readings, with nothing on the right edge.

Ending Histogram.jpg

Compare that to the original histogram before we started with any adjustments.  Major improvement here overall - including a successful recovery of the blown out areas (Only RAW would allow you to accomplish this!

Beginning Histogram.jpg

And here is the final exposure result.  The only other adjustment made here was a slight tweak to the Black Point slider.  A usable and pleasing image has emerged from a shot that was destined for the trash can!

5 - Black Point Adjustment.jpg

Stay tuned . . . more tips to come in the week and months ahead, including one technique where we will actually straddle that right exposure limit - on purpose!

Stay in Focus,

Mark

Overexposed?? - No Problem! (Part 2)

The first step in this quick process starts with the Recovery Slider (Note, this is what Aperture calls it - other programs have similar functions with different names).  The key feature of this slider is that it's a "selective adjustment".

~A selective adjustment only impacts certain areas of the image, based on different criteria.  The Recovery slider selectively reduces exposure and allows recovery of only the most "blown out" areas of the image~

The impact of this slider is significant as it pulls back the most overexposed elements of the image, beginning the process of recovering detail.  We then adjust our second slider, exposure.  Notice that we tweak this just about a third of a stop negative, to assist in our recovery.  Go easy on this slider, and only use it after you've gotten everything you can out of the Recovery Slider.  Exposure is a global adjustment, and will impact all areas of the image.

Slider Adjustments
Slider Adjustments

At this point in the image, you can start to see the blown out areas begin to tone down - but it looks like we still have a long way to go (as you can see in the image blow, sampled after these two adjustments were made).

Highlight and Exposure Adjusted

Now, don't get discouraged yet!  Even though the image still shows a long way to go, look at how much improvement we've really made - as indicated by the histogram.

Histogram after recovery and expsoure adjustments.

So demonstrated progress has been made - and sets the foundation for everything else to come.  With the highlights themselves now properly recovered, we're ready to move on to the most visible corrective adjustment.  In Part 3 of this series we will focus on selectively recovering detail in the highlights - this is where the image really starts to "pop".

Stay in Focus,

Mark